Seam Ripper – Thread Remover Tool Guide for Perfect Sewing Results
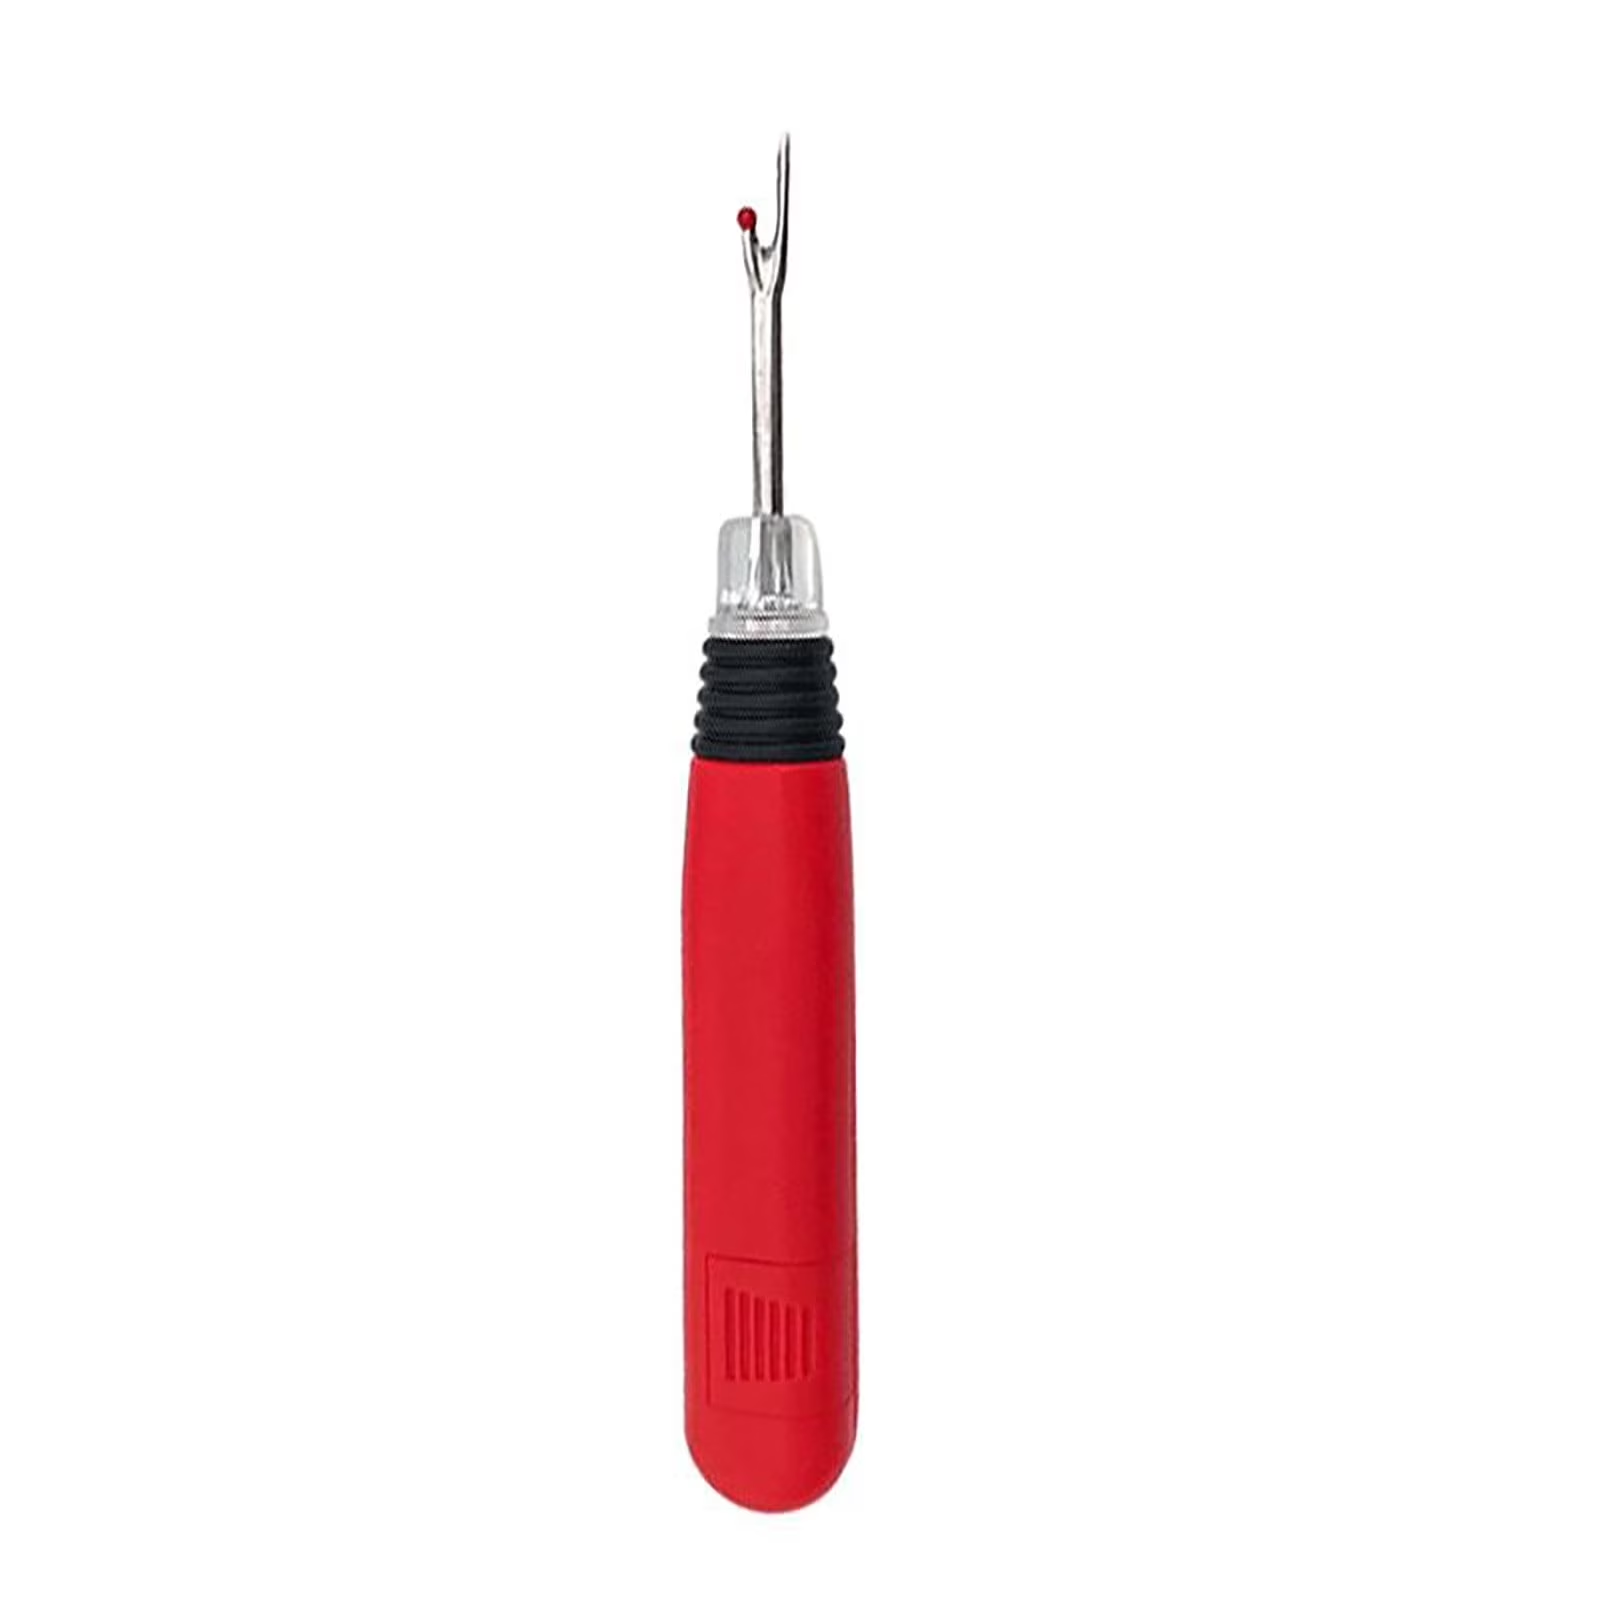
Precision Seam Ripper with Safety Cap
Professional-grade seam ripper featuring ultra-sharp stainless steel blade and ergonomic grip handle. Perfect for delicate fabric work and intricate seam removal. Includes protective safety cap for secure storage and extended blade life.
Key Features:
- Ultra-sharp stainless steel blade
- Ergonomic comfort grip handle
- Protective safety cap included
- Precision pointed tip design
- Lightweight construction
- Professional quality materials
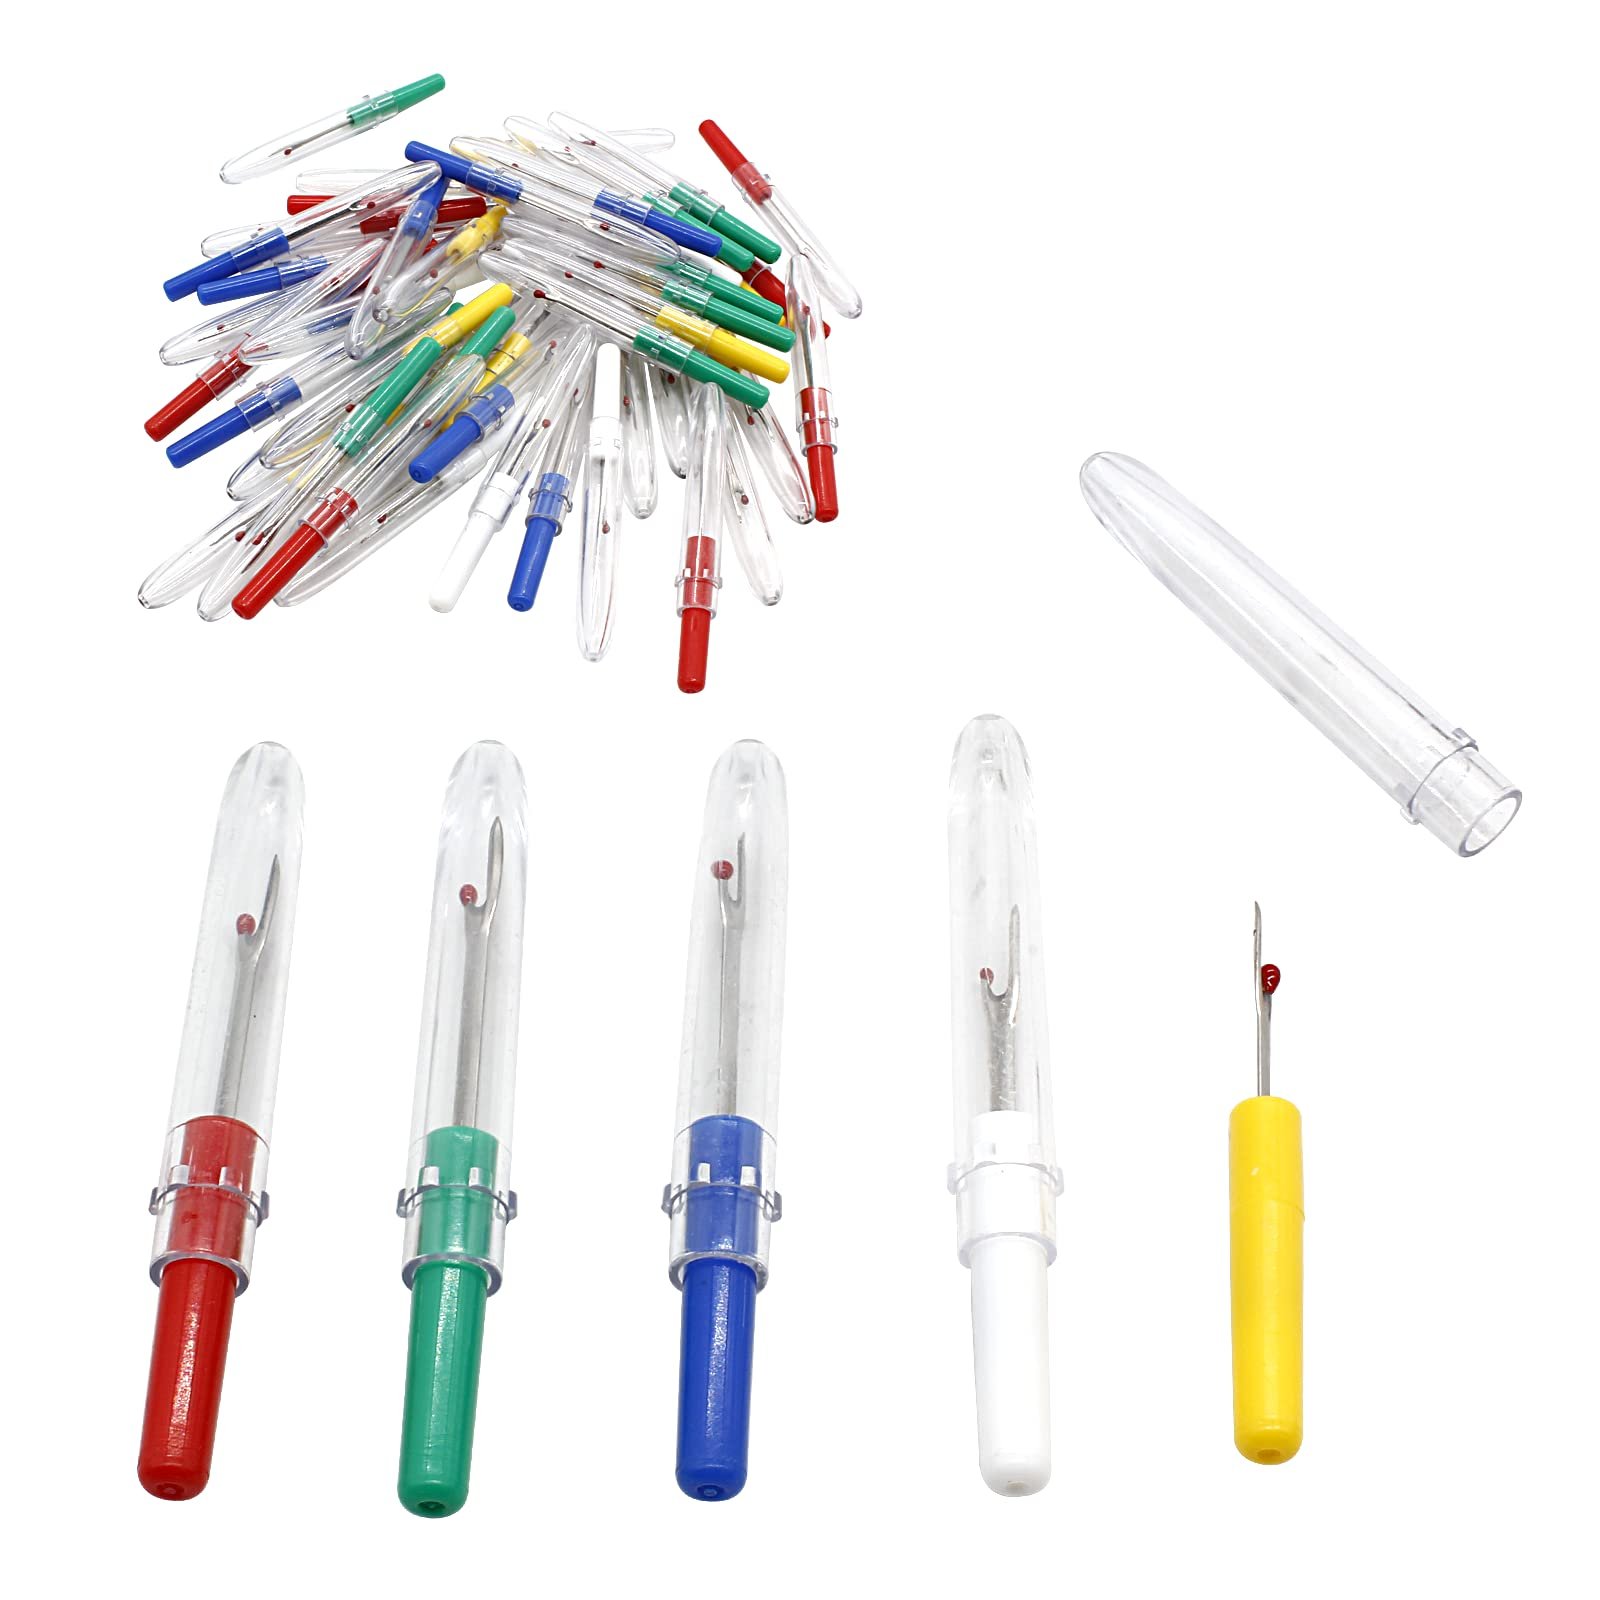
Mini Seam Ripper Set
Compact three-piece seam ripper set ideal for detailed work and travel projects. Features varying blade sizes for different fabric weights and seam types. Convenient storage case keeps tools organized and protected during transport.
Key Features:
- Three different blade sizes
- Compact portable design
- Protective storage case
- Fine-point precision tips
- Multiple grip options
- Travel-friendly size
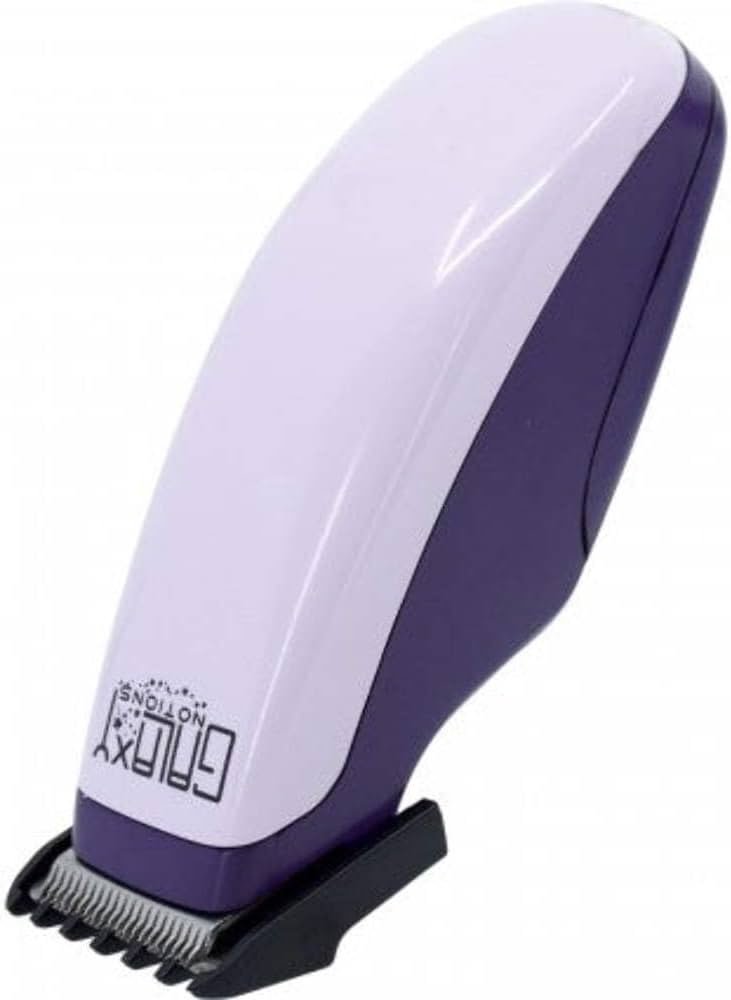
Electric Seam Ripper Tool
Battery-powered electric seam ripper for fast, effortless thread removal on large projects. Adjustable speed settings accommodate various fabric types while preventing damage. Built-in LED light illuminates work area for precise cutting.
Key Features:
- Battery-powered operation
- Adjustable speed settings
- Built-in LED work light
- Ergonomic design reduces fatigue
- Quick thread collection
- Suitable for heavy fabrics

Surgical Seam Ripper with Magnifier
Premium seam ripper with built-in magnifying lens for ultra-precise work on delicate fabrics. Surgical-grade blade ensures clean cuts without fabric damage. Perfect for quilting, embroidery, and fine detail work requiring maximum accuracy.
Key Features:
- Built-in magnifying lens
- Surgical-grade blade quality
- Ultra-precise cutting action
- Comfortable extended handle
- Non-slip grip surface
- Ideal for delicate fabrics
What Is a Seam Ripper and Why Every Sewer Needs One
A seam ripper is an essential sewing tool designed specifically for removing stitches and opening seams without damaging fabric. This indispensable thread remover tool features a sharp, pointed blade that slides easily under threads to cut them cleanly.
Every sewing enthusiast, from beginners to professionals, encounters situations where seams need adjustment or complete removal. Whether correcting mistakes, altering garments, or repurposing fabric pieces, a quality seam ripper makes these tasks quick and efficient.
Essential Components of a Seam Ripper
The typical seam ripper consists of a handle, a curved cutting blade, and a protective cap or cover. The blade features a sharp point for threading under individual stitches and a curved cutting edge for slicing through threads.
High-quality seam rippers include ergonomic handles that reduce hand fatigue during extended use. The protective cap serves dual purposes: safeguarding the sharp blade and preventing accidental cuts during storage.
Different Types of Seam Ripper Tools for Various Projects
Traditional handheld seam rippers remain the most popular choice for general sewing tasks. These versatile tools work effectively on most fabric weights and seam types, making them perfect for everyday sewing projects.
Mini seam rippers excel at detailed work where precision matters most. Their compact size allows access to tight spaces and intricate seam areas that larger tools cannot reach effectively.
Electric Seam Ripper Benefits
Electric seam ripper models offer significant advantages for large projects or frequent use. These powered tools reduce hand strain while increasing efficiency on extensive seam removal tasks.
The consistent cutting action of electric models prevents the fabric pulling that sometimes occurs with manual tools. Built-in features like LED lights and adjustable speeds enhance user control and accuracy.
Specialty Seam Ripper Designs
Surgical seam rippers provide the ultimate precision for delicate fabrics like silk, lace, or fine cotton. Their ultra-sharp blades create clean cuts without snagging or pulling delicate fibers.
Magnifying seam rippers combine cutting capability with visual enhancement, perfect for quilters and embroiderers working on intricate details.
Proper Seam Ripper Technique for Safe and Effective Use
Mastering proper seam ripper technique ensures efficient thread removal while protecting your fabric investment. Always work slowly and deliberately, allowing the tool’s sharp blade to do the cutting work.
Position the seam ripper’s point under individual stitches rather than forcing it through multiple threads simultaneously. This controlled approach prevents accidental fabric tears and ensures clean thread removal.
Step-by-Step Seam Removal Process
Begin by identifying the seam direction and thread tension before inserting your seam ripper. Insert the tool’s point under every third or fourth stitch, cutting systematically along the seam line.
After cutting several stitches, gently pull the fabric pieces apart to release the cut threads. Remove any remaining thread pieces manually or with tweezers for a clean finish.
Safety Considerations When Using Seam Rippers
Always cut away from your body and fingers to prevent accidental injuries. Maintain good lighting in your work area to clearly see stitches and avoid cutting into the fabric.
Store your seam ripper with its protective cap in place to maintain blade sharpness and prevent accidents. Replace dull blades promptly to maintain cutting efficiency and safety.
Seam Ripper Maintenance and Blade Care Tips
Regular maintenance keeps your seam ripper performing at peak efficiency throughout countless projects. Clean the blade after each use to remove fabric fibers and thread residue that can dull the cutting edge.
Wipe the blade with a soft cloth and light oil occasionally to prevent rust and corrosion. Proper storage with the protective cap prevents damage to the sharp point and cutting edge.
Signs Your Seam Ripper Needs Replacement
A dull seam ripper requires more pressure to cut threads, increasing the risk of fabric damage. When you notice increased effort required for cutting or threads snagging instead of cutting cleanly, consider replacement.
Chipped or damaged blade tips cannot provide the precision necessary for quality seam removal. Loose handles or damaged protective caps also indicate it’s time for a new tool.
Extending Seam Ripper Lifespan
Avoid using your seam ripper on inappropriate materials like heavy upholstery or thick canvas that can damage the blade. Use appropriate tools for different fabric weights to maintain optimal performance.
Store seam rippers in a dedicated tool case or magnetic holder to prevent damage from contact with other tools. Proper storage significantly extends tool life and maintains cutting precision.
Choosing the Right Seam Ripper for Your Sewing Projects
Fabric weight and project type should guide your seam ripper selection process. Lightweight fabrics require precision tools with fine points, while heavy materials need robust construction and stronger blades.
Consider your typical project volume when selecting between manual and electric seam ripper options. Occasional sewers often prefer simple manual tools, while frequent users benefit from electric models.
Handle Design and Comfort Features
Ergonomic handle designs reduce hand fatigue during extended seam removal sessions. Look for handles with textured grips that provide secure control even when working with challenging seams.
Handle length affects leverage and control, with longer handles providing more cutting power for tough seams. Shorter handles offer greater precision for detailed work and tight spaces.
Budget Considerations for Seam Ripper Purchase
Basic seam rippers provide excellent value for occasional use and simple projects. These affordable options deliver reliable performance without advanced features or premium materials.
Professional-grade seam rippers justify higher costs through superior materials, advanced features, and extended durability. Consider your long-term sewing goals when evaluating price versus features.
Common Seam Ripper Mistakes and How to Avoid Them
Rushing through seam removal ranks as the most common mistake leading to fabric damage. Taking time to work methodically prevents costly errors and preserves your fabric investment.
Using excessive force when encountering resistance often results in torn fabric or broken seam ripper tips. Instead, examine the seam construction and adjust your technique accordingly.
Preventing Fabric Damage During Seam Removal
Always support the fabric around the seam being removed to prevent stretching or distortion. Place one hand on either side of the cutting area to maintain fabric tension and control.
Work in good lighting conditions to clearly distinguish between threads and fabric fibers. Poor visibility increases the risk of accidentally cutting into the fabric instead of just the threads.
Thread Removal Best Practices
Remove all loose threads after seam ripper use to prepare the fabric for new stitching. Remaining thread fragments can cause problems with new seam construction and affect the finished appearance.
Press the fabric lightly after thread removal to eliminate any marks left by the previous seam. This preparation step ensures professional results in your revised sewing project.
Frequently Asked Questions
Master Your Sewing with the Right Seam Ripper Tools
The seam ripper stands as one of the most essential tools in any sewing kit, transforming potential disasters into learning opportunities. Whether you’re correcting beginner mistakes or making professional alterations, having the right seam ripper makes all the difference in your project outcomes.
From basic manual models to advanced electric versions, today’s seam ripper options cater to every sewing style and project requirement. Consider your typical fabric choices, project frequency, and comfort preferences when selecting the perfect tool for your sewing arsenal.
Proper technique and maintenance ensure your seam ripper serves you well through countless projects. Remember to work slowly, maintain good lighting, and replace dull tools promptly for the best results and safest operation.
Invest in quality seam ripper tools that match your sewing ambitions, and you’ll find that even the most challenging seam removal tasks become manageable parts of your creative process. With the right tools and techniques, every mistake becomes an opportunity to create something even better.